Editor guide
A tour of the Editor
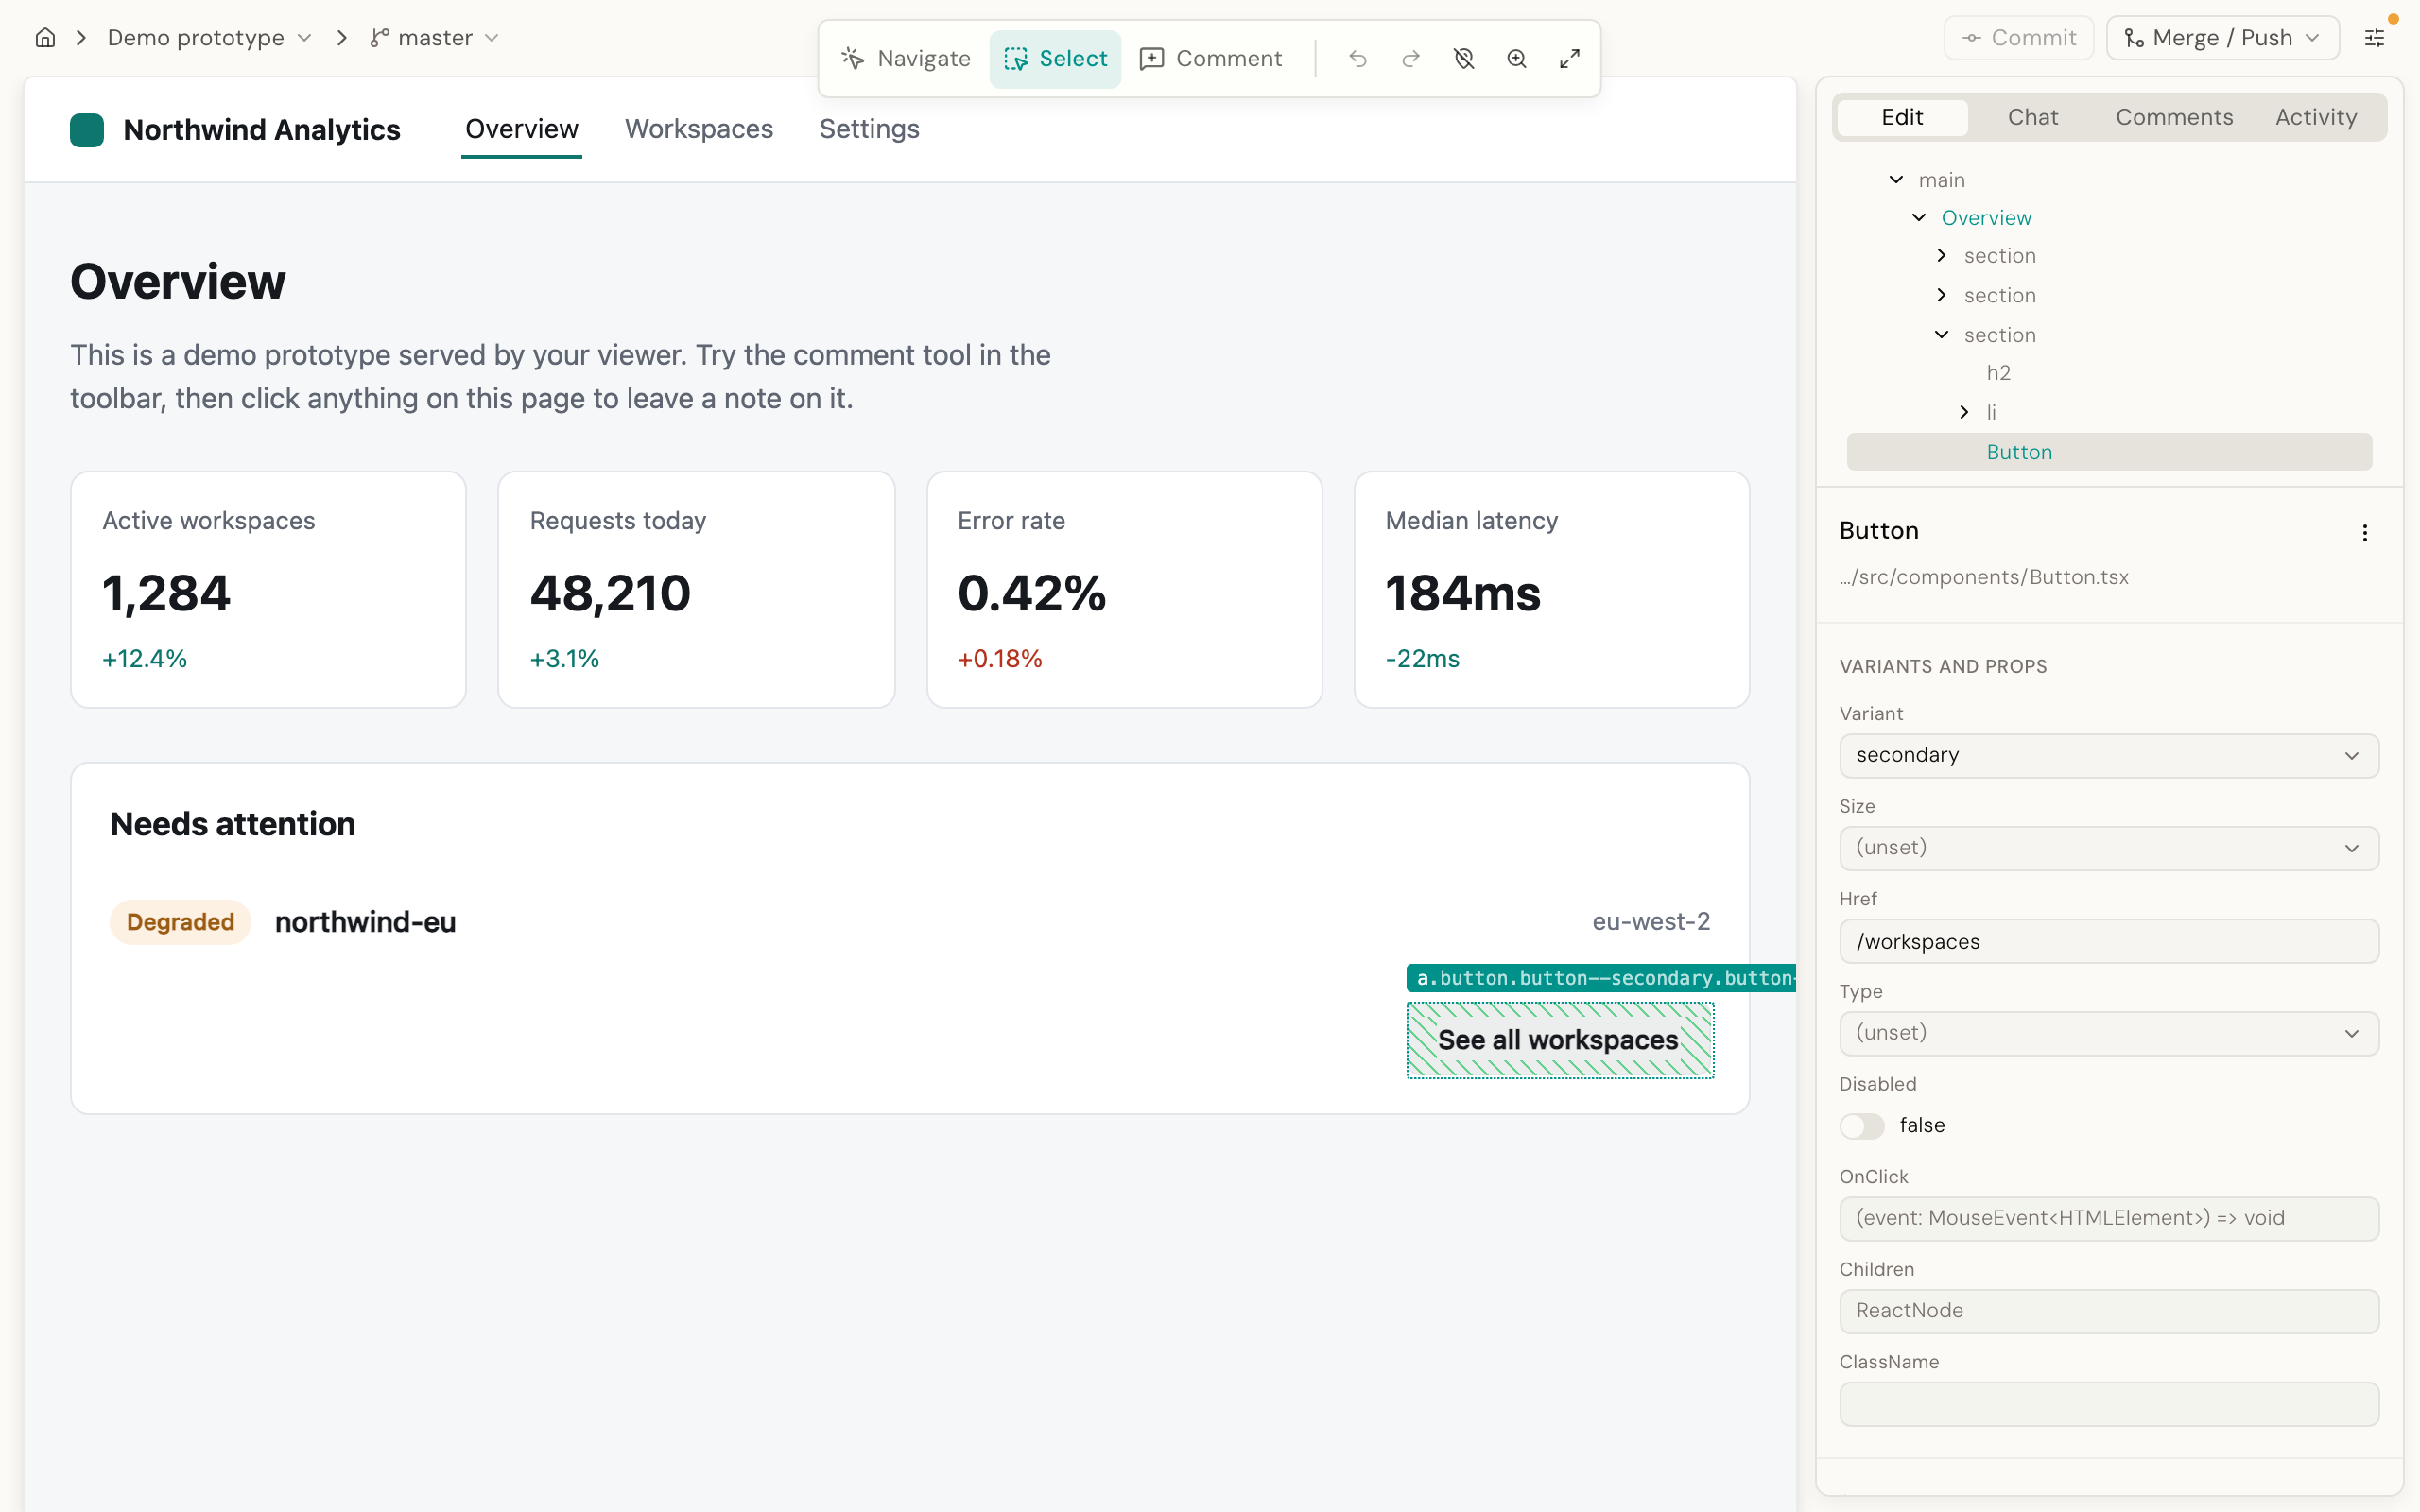
A tour of the Editor screen: the live prototype, the four-tab right rail, the header controls, and the tool picker that decides what a click does.
Once a prototype is open, the Editor has three parts: your prototype running live on the left, a rail of panels on the right, and a header of git and project controls across the top.
The one thing to learn first: the tool picker#
The prototype in the middle is a real, running app. A click on it can mean different things, and a three-way picker in the floating toolbar under the header decides which. There used to be a switch labeled Inspect beside a separate Comment button; both were replaced 2026-08-14 by one picker with three tools: Navigate, Select, and Comment.

- Navigate (the default at startup): the prototype behaves normally. Links navigate, buttons fire, forms accept typing. Use this to walk to the screen and the state you want to work on.
- Select: clicks stop reaching the app and start selecting. Hovering outlines what is under the cursor, clicking selects it into the Inspector, and right-clicking opens a per-element menu.
- Comment: your next click places a comment pin instead of touching the app or selecting anything. See Comments on the prototype.
If clicking a button in your prototype "does nothing", Select or Comment is picked. If clicking an element fails to select it, Navigate is picked. This is the single most common first-run confusion.
Note Switching tools does not clear your selection or discard anything. Switch freely: navigate with Navigate, edit with Select.
Select also enables direct manipulation inside the prototype: you can drag an element to a new position, and drag the row and column edges of a table.
The floating toolbar#
A small cluster hangs off the bottom edge of the header, centered over the prototype: the tool picker, Undo, Redo, then Breakpoint.
Navigate / Select / Comment is the tool picker from the previous section.
Undo / Redo live here too, not in the header. These undo Editor's own edits: each step restores the exact bytes of every file that edit touched. If a file has changed on disk since the step was recorded, the step refuses rather than applying a partial undo, and offers to discard itself so the stack does not jam.
The toolbar's undo keeps the last 50 steps, or 20 MB of file content, whichever limit it hits first.
Warning The undo stack is temporary and is gone once you close Editor. Commit anything you want to keep; see Commit, branch and push for what commit does and the other ways to go back.
Breakpoint (the magnifier icon) forces the preview to a fixed width so your prototype's own responsive CSS renders at that size:
| Option | Preview width |
|---|---|
| Auto | Fills the available pane |
| sm | 640px |
| md | 768px |
| lg | 1024px |
| xl | 1280px |
| 2xl | 1536px |
These widths are Tailwind's default breakpoints. If your prototype defines its own breakpoints at different widths, a preset here may not match one of them.
Picking one constrains the preview to exactly that width, not just a maximum, so the responsive rules actually fire. The pane scrolls sideways if the chosen width is wider than the space available. The Inspector's style controls read and write the styles for whichever breakpoint is active.
A canvas view switcher also lives here, but the canvas is off by default; see editor configuration if you want to turn it on.
The header#
Left to right:
Breadcrumb: home › project ▾ › branch ▾. The home icon returns to the project picker.
The project segment opens a menu with Open in viewer, Copy project link, and
Connect to viewer… (the first two are disabled until the project is linked to a
Viewer). The branch segment lists your git branches, and a
branch is a separate line of work in git that you can switch between: pick one to
switch, or use New branch from <default>, Duplicate current branch,
Rename current branch…, and Publish to <default>… (the last appears only when you are
not already on the default branch).
Commit. Records your current changes in git, with a message. The button shows the number of changed files and is disabled when you have nothing to commit.
Commit records every changed file in your prototype, including files you changed outside Desde, not only the edits Desde made.
There is no Save button in Editor: every edit is already written to disk, and Commit is what turns those edits into git history. See Commit, branch and push for what that means and the other ways to undo.
When an edit needs the AI before it can reach your source, the Commit button is replaced by Apply N with AI until you flush the queue. See Making changes.
Merge / Push. A dropdown of the "send this branch somewhere" actions. Each item is self-disabling and its subtitle doubles as the reason it is unavailable:
- Push branch: commits pending edits, then pushes your branch to GitHub using your own git credentials.
- Merge & push to
<default>: squash-merges into the default branch locally, then pushes the default branch. A squash merge combines all of your branch's commits into one. - Merge to local
<default>: squash-merges locally only. GitHub is untouched. - Open pull request: opens a dialog with a title field and creates the pull request using the GitHub command line tool on your machine, under your own GitHub account. Disabled in two cases, each named in its own subtitle: you are on the default branch, or the repository has no remote to open a pull request against.
You stay on your own branch after either merge.
Editor settings (the ⋮ button). What lives here: AI provider keys (the keys the AI features use, one tab per provider), Model & references (a read-only view of the repo files the AI is grounded in, such as CLAUDE.md), Extensions… (connected tools the AI can use), Design systems (the component libraries Editor grounds the AI in, plus adding one), Reference folders (extra directories the AI may read), Your viewer (the URL and token for your connected Viewer), and Share for review… (labeled Viewer once one is connected).
Hide chrome. Hides the header, the toolbar and the right rail so the prototype fills the window. A single button in the top-right corner brings everything back.
The right rail#
Four tabs: Edit, Chat, Comments, Activity. Drag the rail's left edge to resize it; the width is remembered.
Edit holds the Structure tree at the top. With nothing selected, the tree fills the tab. Select an element and the tab splits: tree above, Inspector below. The divider between them is draggable. See Select and inspect.
Chat is the AI conversation, with a tab strip for parallel chat sessions. See Ask the AI.
Comments holds comments on your prototype. Clicking a pin inside the prototype switches to this tab automatically. See Comments on the prototype.
Activity is one newest-first list mixing edits Editor made with any other uncommitted change in your project, each with its own per-row Undo. Committing empties the list. See Commit, branch and push for how Undo here differs from the toolbar's Undo.
Where messages appear#
Status, failure and connection messages appear as small notices in the bottom-left corner rather than as banners. That includes the connection to your prototype: if a notice says that connection failed, Editor cannot see inside the prototype and nothing will select.
Next#
- Select and inspect: what a selection gives you
- Making changes: text, props, styles and structure
- When Desde says no: what Editor refuses, and why